引言
本篇将介绍我在我的笔记本上部署有关
TensorFlow-GPU时的一些笔记分享。
TensorFlow 是一个端到端开源机器学习平台。它拥有一个全面而灵活的生态系统,其中包含各种工具、库和社区资源,可助力研究人员推动先进机器学习技术的发展,并使开发者能够轻松地构建和部署由机器学习提供支持的应用。
本文将着重介绍在
Windows上的部署方案。
 |
 |
 |
|---|---|---|
| 在即刻执行环境中使用 Keras 等直观的高阶 API 轻松地构建和训练机器学习模型,该环境使我们能够快速迭代模型并轻松地调试模型。 | 无论您使用哪种语言,都可以在云端、本地、浏览器中或设备上轻松地训练和部署模型。 | 一个简单而灵活的架构,可以更快地将新想法从概念转化为代码,然后创建出先进的模型,并最终对外发布。 |
获取 Nvidia 相关开发组件
CUDA 与 cuDNN 有着
严格的版本规定,建议在部署前核查好版本。
我的部署版本为:CUDA v11.5 + cuDNN v8.3.3
- CUDA
Nvidia • CUDA Toolkit Documentation
- cuDNN(需登录 Nvidia 账号)
- ZLIB
将zlibwapi.dll所在文件夹添加到系统变量。
迁移关键文件
针对该步骤,Nvidia 官方文档中的描述如下:
a. Copy
\cuda\bin\cudnn*.dll to C:\Program Files\NVIDIA GPU Computing Toolkit\CUDA\vx.x\bin. b. Copy
\cuda\include\cudnn*.h to C:\Program Files\NVIDIA GPU Computing Toolkit\CUDA\vx.x\include. c. Copy
\cuda\lib\x64\cudnn*.lib to C:\Program Files\NVIDIA GPU Computing Toolkit\CUDA\vx.x\lib\x64.
添加系统变量
变量键: CUDA_PATH
变量值: C:\Program Files\NVIDIA GPU Computing Toolkit\CUDA\vx.x
终端核验
- 我的CUDA安装位置:C:\Program Files\NVIDIA GPU Computing Toolkit\CUDA\v11.5\extras\demo_suite
nvcc -V
PS C:\Users\P7XXTM1-G> nvcc -V
nvcc: NVIDIA (R) Cuda compiler driver
Copyright (c) 2005-2021 NVIDIA Corporation
Built on Mon_Sep_13_20:11:50_Pacific_Daylight_Time_2021
Cuda compilation tools, release 11.5, V11.5.50
Build cuda_11.5.r11.5/compiler.30411180_0
deviceQuery.exe
PS C:\Program Files\NVIDIA GPU Computing Toolkit\CUDA\v11.5\extras\demo_suite> .\deviceQuery.exe
C:\Program Files\NVIDIA GPU Computing Toolkit\CUDA\v11.5\extras\demo_suite\deviceQuery.exe Starting...

 CUDA Device Query (Runtime API) version (CUDART static linking)

Detected 1 CUDA Capable device(s)

Device 0: "NVIDIA GeForce GTX 1060"
  CUDA Driver Version / Runtime Version          11.6 / 11.5
  CUDA Capability Major/Minor version number:    6.1
  Total amount of global memory:                 6144 MBytes (6442254336 bytes)
  (10) Multiprocessors, (128) CUDA Cores/MP:     1280 CUDA Cores
  GPU Max Clock rate:                            1771 MHz (1.77 GHz)
  Memory Clock rate:                             4004 Mhz
  Memory Bus Width:                              192-bit
  L2 Cache Size:                                 1572864 bytes
  Maximum Texture Dimension Size (x,y,z)         1D=(131072), 2D=(131072, 65536), 3D=(16384, 16384, 16384)
  Maximum Layered 1D Texture Size, (num) layers  1D=(32768), 2048 layers
  Maximum Layered 2D Texture Size, (num) layers  2D=(32768, 32768), 2048 layers
  Total amount of constant memory:               zu bytes
  Total amount of shared memory per block:       zu bytes
  Total number of registers available per block: 65536
  Warp size:                                     32
  Maximum number of threads per multiprocessor:  2048
  Maximum number of threads per block:           1024
  Max dimension size of a thread block (x,y,z): (1024, 1024, 64)
  Max dimension size of a grid size    (x,y,z): (2147483647, 65535, 65535)
  Maximum memory pitch:                          zu bytes
  Texture alignment:                             zu bytes
  Concurrent copy and kernel execution:          Yes with 1 copy engine(s)
  Run time limit on kernels:                     Yes
  Integrated GPU sharing Host Memory:            No
  Support host page-locked memory mapping:       Yes
  Alignment requirement for Surfaces:            Yes
  Device has ECC support:                        Disabled
  CUDA Device Driver Mode (TCC or WDDM):         WDDM (Windows Display Driver Model)
  Device supports Unified Addressing (UVA):      Yes
  Device supports Compute Preemption:            Yes
  Supports Cooperative Kernel Launch:            Yes
  Supports MultiDevice Co-op Kernel Launch:      No
  Device PCI Domain ID / Bus ID / location ID:   0 / 1 / 0
  Compute Mode:
     < Default (multiple host threads can use ::cudaSetDevice() with device simultaneously) >

deviceQuery, CUDA Driver = CUDART, CUDA Driver Version = 11.6, CUDA Runtime Version = 11.5, NumDevs = 1, Device0 = NVIDIA GeForce GTX 1060
Result = PASS
bandwidthTest.exe
PS C:\Program Files\NVIDIA GPU Computing Toolkit\CUDA\v11.5\extras\demo_suite> .\bandwidthTest.exe
[CUDA Bandwidth Test] - Starting...
Running on...

 Device 0: NVIDIA GeForce GTX 1060
 Quick Mode

 Host to Device Bandwidth, 1 Device(s)
 PINNED Memory Transfers
   Transfer Size (Bytes)        Bandwidth(MB/s)
   33554432                     12440.9

 Device to Host Bandwidth, 1 Device(s)
 PINNED Memory Transfers
   Transfer Size (Bytes)        Bandwidth(MB/s)
   33554432                     12180.1

 Device to Device Bandwidth, 1 Device(s)
 PINNED Memory Transfers
   Transfer Size (Bytes)        Bandwidth(MB/s)
   33554432                     54242.5

Result = PASS

NOTE: The CUDA Samples are not meant for performance measurements. Results may vary when GPU Boost is enabled.
安装 Anaconda
对于需要管理多个Python开发环境的开发者来说,Anaconda为开发者提供开箱即用的开发环境,集成包括数据科学与机器学习在内的多个开发环境与开发组件,开发者可无需花费大量时间在部署开发环境上,大幅提高开发效率。
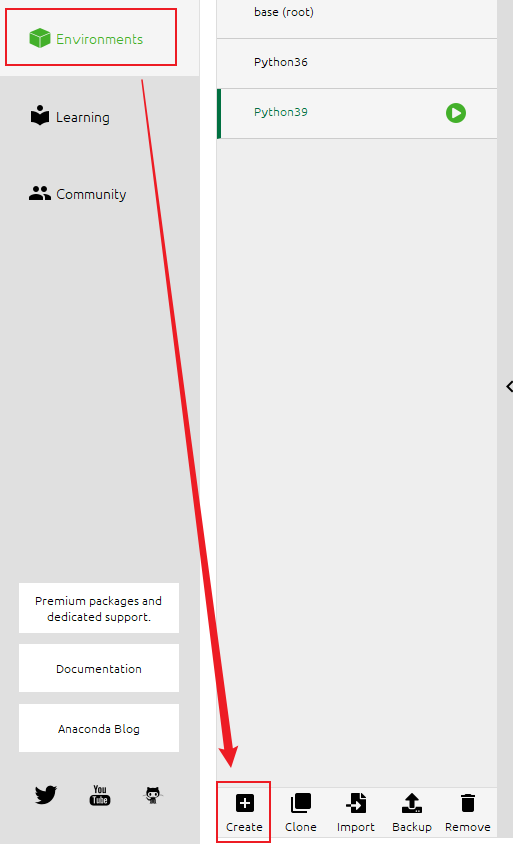
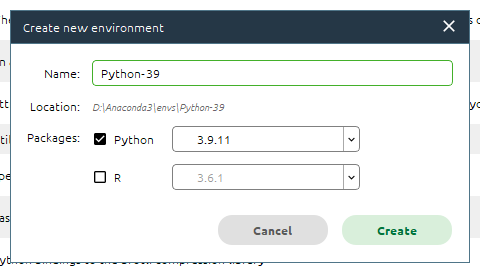
新增一个本地环境
Anaconda安装完成后,将会自带一个基于 Python 3.9.7 的基础开发环境,但此处我们不建议直接使用该基础环境。
本文将新建一个基于 Python 3.9.11 的开发环境用于部署 TensorFlow-GPU。
 |
 |
|---|
部署 TensorFlow-GPU
pip install tensorflow-gpu
在 Jupyter Notebook 中核验
import tensorflow as tf

print(tf.__version__)
输出如下:
2.8.0
